A Proven Method for Installing
Weathering Course Tiles
9 Steps of ABC Weathering Tile Fixing:
At ABC Ceramic, we specialize in offering high-quality Weathering Course Tiles that not only enhance the aesthetics of your terrace but also provide unmatched protection against extreme climatic conditions. The secret to long-lasting performance lies not just in the tiles but in how they are installed. Our 9-step tile fixing method ensures your
weathering tiles are installed with precision and durability in mind.
Whether you're a contractor, architect, or homeowner, understanding these 9 essential steps will help you ensure a leak-proof, insulated, and beautiful rooftop.
Step 1: Surface Cleaning and Preparation
Before laying cool roof tiles it's crucial to prepare the surface. The roof slab must be thoroughly cleaned to remove dust, grease, oil, or any loose particles. Proper cleaning allows the adhesive and mortar to bond strongly, which is essential for the longevity of weathering tiles. This stage also includes checking for any surface cracks and filling them in advance.
Step 2: Slope Checking
Efficient water drainage is a fundamental requirement for any terrace. Our team checks the roof slope to ensure water flows seamlessly toward the outlets. Improper slopes can lead to water stagnation, which eventually damages the Weathering Course Tiles underlying surface.
Step 3: Base Layer Application
A mortar mix, usually composed of cement and sand, is prepared and spread evenly as the base layer. This layer acts as the foundation on which the Weather Proof Tiles are fixed. At ABC Ceramic, we use a specific ratio that enhances bonding and sets the perfect stage for tile installation.
Step 4: Curing of Base Layer
Curing the base layer is a non-negotiable step. It allows the mortar to settle and strengthens the surface. We allow adequate curing time to ensure the layer gains its full strength and is free from cracks and shrinkage before the weathering tiles are laid.
Step 5: Tile Soaking
Before installation, our Weathering Course Tiles are soaked in water. This process prevents the tiles from absorbing moisture from the mortar, which can weaken the bond. Soaking also minimizes the chances of cracks due to thermal expansion post-installation.
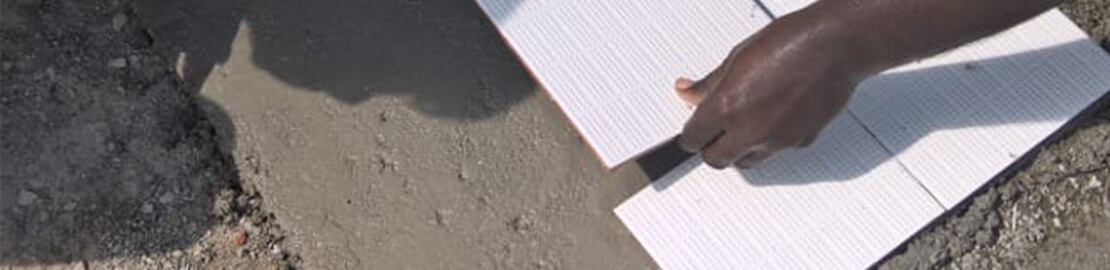
Step 6: Fixing Tiles
Tiles are laid out precisely using the chalk line method to maintain alignment and spacing. Each tile is pressed gently but firmly into the mortar bed, ensuring maximum contact and grip. The corners are aligned neatly for a uniform finish, which is crucial for both aesthetics and functionality.
Step 7: Joint Filling
Tile joints are filled with a specialized mix that prevents water seepage. This mix also accommodates slight movements due to expansion and contraction, a common issue in weather-exposed areas. Proper joint filling plays a pivotal role in maintaining the life and performance of weathering tiles.
Step 8: Final Curing
Once the Weather Proof Tiles and joints are set, the entire surface undergoes final curing. Water is sprinkled over the tiled surface regularly for a few days to ensure the tiles are firmly bonded and the mortar has cured well. This step helps in preventing tile loosening and enhances durability.
Step 9: Surface Finishing and Cleaning
Finally, the Weather Proof Tiles surface is cleaned thoroughly to remove any mortar residues and dust. We perform a quality check to ensure proper slope, perfect joint sealing, and overall finish. Your terrace is now ready, protected with premium Weathering Course Tiles designed to withstand India's diverse climate.
Why Choose ABC Ceramic’s Weathering Tiles?
Our cool roof tiles are manufactured using advanced technology and high-grade materials, ensuring heat insulation, water resistance, and extended durability. ABC Ceramics Weathering Course Tiles come in various textures, finishes and sizes, offering both functional and aesthetic benefits. With our tested 9-step fixing process, we guarantee a rooftop that stays cool, dry, and stylish year-round.
If you're planning to upgrade your terrace or looking for a long-term solution against weather damage, get in touch with us today for cool roof expert consultation and high-quality weathering tiles.
Enquire Now!
Weathering course tiles laying procedure
Abc Weather Proof SRI Tiles fixing method on Terrace Slab
- Prepare the Cool Roof Tiles surface with required slope as per civil work specifications by using suitable materials/methods etc.
- Rain water outlets are to be specified and slope has to be perfectly maintained.This is to be completed by the client as per Engineer / Architect plan for life time solution.
- ABC company has no role till this stage. abc Tile fixing will be done only on the well prepared sloped roof surface. Roof area must be neat and clean. No other work should take place during tile fixing.
- Materials required to fix abc Weather Proof S.R.I Tiles abc Plus powder, abc grout, abc Nano Clear, abc Nano White, PPF Fiber, abc Spacers, abc Weather Proof Tiles Whitener etc.
- Use 15:1 sand: cement mortar to fix abc Tiles with already specified slope.
- Soak tiles in to nano water (100 ml abc nano liquid in 150 liter clean water) for 25 to 30 minutes and remove defective tiles, if found. Whatever the damage, must be recorded.
- Prepare cement slurry (20 liters) as below: Add 200 to 250 ml abc nano white add one pack (25 gm) PPF in clean water wait for 15 minutes: Mix Ultratech cement (or equivalent) and abc plus powder @ 3:1 ratio. Mix well and adjust water to the required level.
- Fix abc tile on 15:1 mortar by using cement slurry and use a 3 mm spacer between tiles. Ensure that each tile is fixed firmly in wet condition. Do not walk over the tile for 24 hours.
- 4 inch skirting has to be given in all sides in slanting position.
- Wash the tiles surface and inspect for proper fitting of each tile. Apply abc grout paste in 3 mm gap. Prepare grout with abc nano white @ 100 ml for every kg of abc grout and add required qty. of clean ppf mixed water (Mix 4 gm PPF fiber).
- After 24 hours of grouting, give a top coat over the grout by using abc Nano Clear (100 ml in 2 liters of clean water). Consume within 24 hours. During final inspection, if any micro hairline appears here and there, give a touch up by using abc Weather Proof Tiles Whitener.
- Final washing of entire area will be charged extra. Make sure that Water proofing is done above skirting i.e on parapet wall etc by painting contractor. Extra charges if abc layer does this job.
ABC weathering course Tile
- Low installation cost
- Brand name recognition
- Low roof maintenances
- Product warranty
- Labor warranty
- Long lasting waterproofing protection
- No chipping, no cracking, no flaking.
- Stain free and better scratch resistance
- Attractive and clean finish
- Anti slippery during wet conditions
- Energy saving radiant barrier
- Reduced heat transfer
- Protection against UV degradations
- Roof structural integrity
- Corrosion control in sea shore area
- Environmentally friendly product
- Economical solutions
- Long life cycle
What will you do
- Check our catalog & Tile fixing specifications
- Check our references
- Verify our claims
- Compare us with the competition & service after sales
- Contact us for a free estimate.